New GB on Mudflap DIY kits
 23 October 2004, 10:52 PM
#121
Scooby Regular
Join Date: Jul 2004
Location: A Yorkshireman living in Lancashire, Recruiting for the War of the Roses part deux!
Posts: 945
Likes: 0
Received 0 Likes
on
0 Posts
[QUOTE=austen_wrx]Jesus!! 2 hrs!! I'm an engineer, but you must have boss eyes 
 .
.
Haha you said it The Boss's eye's ! As you will know Square lines mean everything ! I don't work to a thou, i work dead on ! Wish sometimes i was normal though, You know Bodge it and Scarper !
. Haha you said it The Boss's eye's ! As you will know Square lines mean everything ! I don't work to a thou, i work dead on ! Wish sometimes i was normal though, You know Bodge it and Scarper !

 24 October 2004, 01:11 PM
#123
Scooby Regular
Join Date: Jul 2004
Location: A Yorkshireman living in Lancashire, Recruiting for the War of the Roses part deux!
Posts: 945
Likes: 0
Received 0 Likes
on
0 Posts
A tip for you boy's that hav'nt started the manufacture of the flaps, Use a pritt stick to glue the template onto the Ali, when you have cut them out just soak in some warm water and the template comes straight off, Also Don't drill the holes in the Mudflap material seperately i'ts easier to drill through the Ali and the flap that way you know the holes are going to line up ! Unlike mine which are just slightly out.
Ok now just need to fit them !
Ok now just need to fit them !
25 October 2004, 06:20 PM
#124
Scooby Regular
Thread Starter

Join Date: Nov 2002
Location: Birmingham
Posts: 3,282
Likes: 0
Received 0 Likes
on
0 Posts
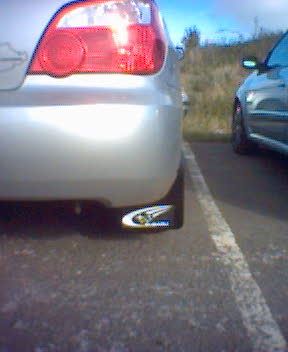
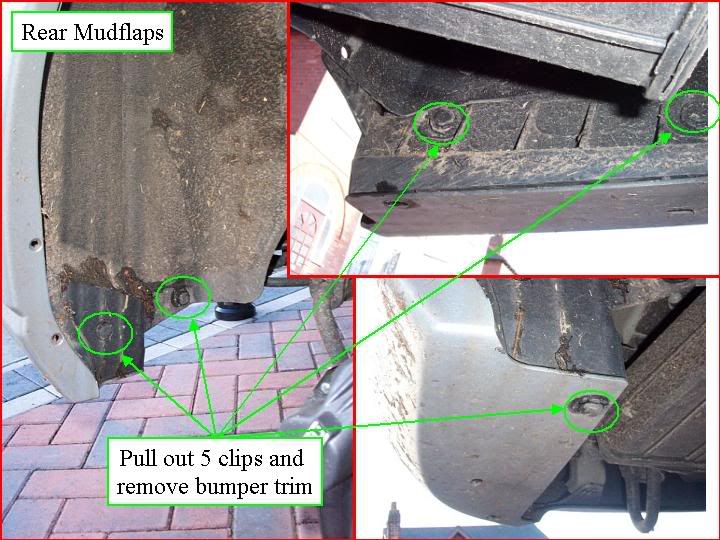
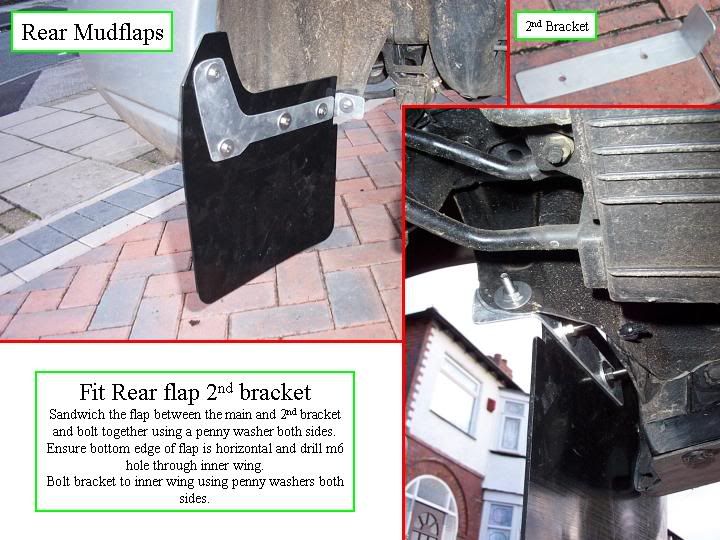
I fitted the rears today!! 


I made a 3rd bracket from bits of ali i had in the garage, but if you extend the rear bracket on your template and bend it, it will do exactly the same thing. Or there is enough material from the off cuts of the ali i sent to make the 3rd bracket, as long as it only goes through the one bolt.
I made a 3rd bracket from bits of ali i had in the garage, but if you extend the rear bracket on your template and bend it, it will do exactly the same thing. Or there is enough material from the off cuts of the ali i sent to make the 3rd bracket, as long as it only goes through the one bolt.

 26 October 2004, 01:34 PM
#127
Moderator

iTrader: (5)
Join Date: Nov 2001
Location: Not all those who wander are lost
Posts: 17,863
Received 0 Likes
on
0 Posts
Excellent pics mate, appreciated Will come in very handy when I get around to fitting mine.
Fitting pics of the fronts would be great too when you do those I hate going into these jobs blind, like to gather as much info as poss first
Will come in very handy when I get around to fitting mine.Fitting pics of the fronts would be great too when you do those
I hate going into these jobs blind, like to gather as much info as poss first
26 October 2004, 06:02 PM
#128
Scooby Regular

Join Date: Apr 2004
Posts: 95
Likes: 0
Received 0 Likes
on
0 Posts
Austen, looks good so far...I haven't even got around to unrolling the kaylan yet! 
Noddy question re stickers....does anyone know a particularly good place to get some STi ones?....Scoobyparts do some, but only up to 100mm wide (they may do wider than whats in catalogue, just havent got around to calling them)...Any ideas?
Looking for boggo-standard white to go on black flaps (oo-er)
26 October 2004, 07:18 PM
#129
Moderator
iTrader: (5)
Join Date: Nov 2001
Location: Not all those who wander are lost
Posts: 17,863
Received 0 Likes
on
0 Posts
I'll be getting my graphics from my usual chap, Mook @ www.skewer.co.uk
Did a superb job on my DC Sports banner on my old CTR Just send let him know what you want and he'll make it up.
Did a superb job on my DC Sports banner on my old CTR
Just send let him know what you want and he'll make it up.
28 October 2004, 10:17 PM
#130
Scooby Regular
Thread Starter
Join Date: Nov 2002
Location: Birmingham
Posts: 3,282
Likes: 0
Received 0 Likes
on
0 Posts
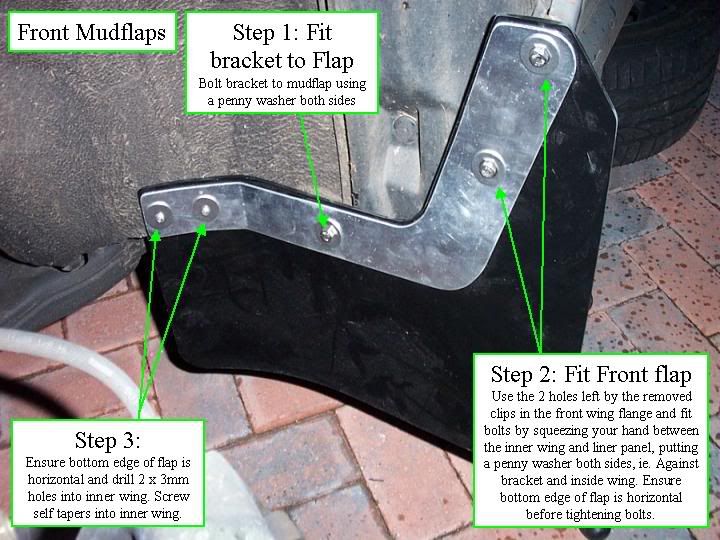
Finished!!!! Did the fronts tonight!!

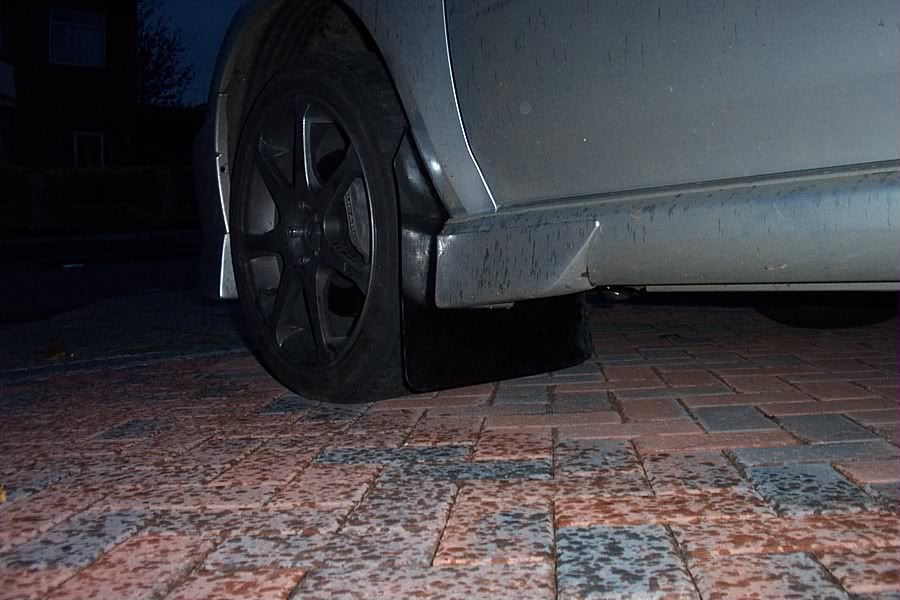
You have to remove the 2 fixings that you use for the bolts in the wing, and the 3 fixings on the inner wing plastic liner, you can then squeeze your hand in to hold the nuts and washes in place. It a bit tricky but not too bad.
Did the fronts tonight!!You have to remove the 2 fixings that you use for the bolts in the wing, and the 3 fixings on the inner wing plastic liner, you can then squeeze your hand in to hold the nuts and washes in place. It a bit tricky but not too bad.


 04 November 2004, 01:08 PM
#137
Scooby Regular
Join Date: Apr 2004
Posts: 95
Likes: 0
Received 0 Likes
on
0 Posts
Great pics Austen, cheers for those...hopefully they're pretty similar to the classics, except the shape of the brackets/flaps.
Found a good guy on eBay that did the STi stickers for me...bargain price, 99p for a pair!!!
Got 4 pairs made up in 2 sizes, 120mm and 140mm, just in case...you can find him here...very responsive, had mine the next day, in a stiff-backed envelope to stop them creasing.
SignCreate
Cheers
Spen
Found a good guy on eBay that did the STi stickers for me...bargain price, 99p for a pair!!!
Got 4 pairs made up in 2 sizes, 120mm and 140mm, just in case...you can find him here...very responsive, had mine the next day, in a stiff-backed envelope to stop them creasing.
SignCreate
Cheers
Spen

 15 November 2004, 08:58 AM
#140
Moderator
iTrader: (5)
Join Date: Nov 2001
Location: Not all those who wander are lost
Posts: 17,863
Received 0 Likes
on
0 Posts
Finally got mine fitted at the weekend, what a nightmare of a job ! My hands are killng me  Scratched to pieces
My front flaps scrape when I go around corners too Think its because I have the Prodrive springs and its a little lower. What sort of ground clearance does everyone else have on the fronts ?
Scratched to pieces My front flaps scrape when I go around corners too
Think its because I have the Prodrive springs and its a little lower. What sort of ground clearance does everyone else have on the fronts ?
15 November 2004, 09:59 AM
#141
Scooby Regular
Thread Starter
Join Date: Nov 2002
Location: Birmingham
Posts: 3,282
Likes: 0
Received 0 Likes
on
0 Posts
Looking good Lee!!
Yeah mine scrap aswell, and i still have the standard springs. I am putting off cutting them down until i have my eibachs fitted, plus i'm not looking forward to squeezing my hand back in there again!!
Yeah mine scrap aswell, and i still have the standard springs. I am putting off cutting them down until i have my eibachs fitted, plus i'm not looking forward to squeezing my hand back in there again!!
15 November 2004, 10:40 AM
#142
Scooby Regular

Join Date: Dec 2003
Posts: 186
Likes: 0
Received 0 Likes
on
0 Posts
As you know the WR1 has Prodrive springs and I find that the only time I've really noticed them scrape is under compression after going over a dip in the road not really around bends?
15 November 2004, 10:54 AM
#143
Moderator
iTrader: (5)
Join Date: Nov 2001
Location: Not all those who wander are lost
Posts: 17,863
Received 0 Likes
on
0 Posts
Not looking forward to shredding my hands again either !
I think I'm going to have to remove at least an inch from the bottom of the front flaps to get them to clear when cornering. Getting some funny looks at the moment
I only have about 15mm clearance on level ground, so with a little body roll it scrapes.
I think I'm going to have to remove at least an inch from the bottom of the front flaps to get them to clear when cornering. Getting some funny looks at the moment
I only have about 15mm clearance on level ground, so with a little body roll it scrapes.
16 November 2004, 02:48 PM
#144
Scooby Regular
Join Date: Apr 2004
Posts: 95
Likes: 0
Received 0 Likes
on
0 Posts
Has anyone got any pics of the mudflaps on a Classic please?....mine are all cut and ready to go, but looking at the rears, the holes are nowhere near (like 25mm out) lining up with the predrilled one on the bodywork and the one attaching bumper trim to bumper.
Am I being stupid here?
Edited to say....almost done the rear mudflaps...remembered the RavenBlade site...
Any pics like what Austen did for the New Age would be, er, fantastic!
...still got to do the fronts, but fingers crossed and a bit of lateral thinking!
Cheers in advance
Spen
Am I being stupid here?
Edited to say....almost done the rear mudflaps...remembered the RavenBlade site...
Any pics like what Austen did for the New Age would be, er, fantastic!
...still got to do the fronts, but fingers crossed and a bit of lateral thinking!
Cheers in advance
Spen
Last edited by Spenny_B; 16 November 2004 at 05:50 PM.

Thread
Thread Starter
Forum
Replies
Last Post