
Scoobyworld mudflap fitting
 10 July 2012, 04:55 PM
#1

Anyone local to me able to lend a hand fitting my new mudflaps, I don't have a car jack and not sure where to start!
Obviously there will be some beers and my great company!
Obviously there will be some beers and my great company!
Last edited by Knotty_; 10 July 2012 at 04:56 PM.
 11 July 2012, 12:55 PM
#3
Scooby Regular
Hi Knotty,
I got these too, I am round my mates Friday afternoon... Going to have a bash. Looked on the net and some people reckon they can do the backs without taking the rims off... I am in harwich so it might be a bit far for you to get to me, plus its gonna be our first attempt lol.. But if Harwich isnt too far and you fancy a drive tomorrow then send us a PM... If you manage to do yours before Friday let me know how you get on lol.
Think the worst bit ( apart from sifting through all the correct screws) is drilling into the front arch lol
11 July 2012, 01:38 PM
#4
Scooby Regular
Sorry Knotty ! I meant drive Friday lol.... I am not that far away .... doh... another typo, everytime ......thats why I dont post on here too much....
I think I saw Andy purchased some, so maybe worth asking Andy if he is nearer lol
And before anyone else takes the mick I will put the giff in below and laugh at myself :

I think I saw Andy purchased some, so maybe worth asking Andy if he is nearer lol
And before anyone else takes the mick I will put the giff in below and laugh at myself :
11 July 2012, 01:48 PM
#6
Scooby Regular
Join Date: Jul 2011
Location: Essex
Posts: 454
Likes: 0
Received 0 Likes
on
0 Posts
Hi, sorry to jump in here but I was looking to buy some of these myself! I was actually going to order them last week but decided to leave it until the end of the month.
I didn't realise they were awkward to fit in my naivety I assumed they were a simple screw driver job! lol
Whoops! If its not too much trouble Knotty, could you let me know how you got on when you do get round to fitting them? Stories of requiring car jacks, removing wheels and drilling through arches is making me wonder whether it would be too much hassle.
Thanks
I didn't realise they were awkward to fit
in my naivety I assumed they were a simple screw driver job! lolWhoops! If its not too much trouble Knotty, could you let me know how you got on when you do get round to fitting them? Stories of requiring car jacks, removing wheels and drilling through arches is making me wonder whether it would be too much hassle.
Thanks
Trending Topics
11 July 2012, 01:55 PM
#8
Scooby Regular
Will be at my mates for half twelve, so early afternoon if you can. If you can, let me know and I will give you the address..... will say as this is my first flap session cant guarantee how long it takes but looks like an hour or so.

11 July 2012, 02:03 PM
#9
Scooby Regular
Hi,
I can e mail the instructions tomorrow if you like on a PDF file, have a look and then you can make your mind up ..... It sounds worse than what it is.... And you may not have to take all your rims off, just some people do and some have said they didnt. If yours is a newage then you only have to drill 2 holes to mark a point for the self tapping screws to fix the bracket to the inner arch mate
I can e mail the instructions tomorrow if you like on a PDF file, have a look and then you can make your mind up ..... It sounds worse than what it is.... And you may not have to take all your rims off, just some people do and some have said they didnt. If yours is a newage then you only have to drill 2 holes to mark a point for the self tapping screws to fix the bracket to the inner arch mate
11 July 2012, 02:07 PM
#10
Scooby Regular
Lol Mate,
If Ron is nearer maybe a better option... plus he has tools

Hey Ron,
You nicked me date lol
 11 July 2012, 02:36 PM
#11
Ron is quite a bit closer!
Frizzle-Dee: They don't look too bad for fitting, but most definitely the front wheels will have to come off to attach the brackets to the wheel arch. The rears look the same but there is slightly more room.
Ron: That would be great mate, Saturday evening would suit better as I will have the little'un all day until the mrs is home. Failing that another day?
11 July 2012, 05:51 PM
#13
Scooby Regular
Join Date: Jul 2011
Location: Essex
Posts: 454
Likes: 0
Received 0 Likes
on
0 Posts
Yeah, let us know how you get on as it'll be handy to hear how you found it.
Didly- If that offer to email a PDF was aimed at me then that would be really helpful. Thank you! Let me know and I'll PM you my email address.
I want to change my alloys in a few months anyway so I guess I could always have them fitted then and it would be killing two birds with one stone (plus that way I can get someone else to do it lol)
Anyhu, sorry I hijacked this thread, but the timing seemed pretty impeccable
Cheers
Didly- If that offer to email a PDF was aimed at me then that would be really helpful. Thank you! Let me know and I'll PM you my email address.
I want to change my alloys in a few months anyway so I guess I could always have them fitted then and it would be killing two birds with one stone (plus that way I can get someone else to do it lol
)Anyhu, sorry I hijacked this thread, but the timing seemed pretty impeccable
Cheers
12 July 2012, 06:00 PM
#17
Scooby Regular
iTrader: (6)
Join Date: May 2011
Location: Bringing up the rear of convoys since 2010!
Posts: 2,917
Likes: 0
Received 0 Likes
on
0 Posts
Adam mine arrived yesterday, only saw this thread now as our Internet at home is down. Going to have a go on Saturday. Got the staple gun and No More Nails at the ready.
12 July 2012, 09:20 PM
#19
Scooby Regular
iTrader: (2)
Join Date: Feb 2003
Location: 2.1 Spec-C .......Pimms O'clock!!
Posts: 2,726
Likes: 0
Received 0 Likes
on
0 Posts
Guy's, mudflaps aren't particularly hard, you can fit them to the fronts without taking the wheels off, just jack each side up and put the steering on full lock, should be plenty of room. The rears need 1 self tapper and a hole drilled in the metal arch on each side, it can be done without taking the wheels off but is much easier taking them off so there is room for access and a drill (it's only a small hole so don't stress!).
That is for the brackets, the rubber flaps are held onto the brackets with plastic push studs and a nut and bolt, should only take a couple of hours to fit all four, make sure they are all straight which sometimes involves a little bending of the bracket then Bob's your Uncle, Fanny's your Aunt, you can go 'flapping' to your hearts content
Rally stage anyone??
13 July 2012, 02:58 PM
#21
Scooby Regular
Hi chaps .. Flaps fitted.. 1 hour job and quite easy :-) no wheels off... (or back ) For the front , jack up and full lock and happy (tight) days getting the self tapers in.
Can't post pics as from my phone but they look good... More importantly should stop some of the pesky stones doing any more pitting to the paint. I am no mechanic so if you toy around with your car you will sail through this :-)
Happy flapping !
Can't post pics as from my phone but they look good... More importantly should stop some of the pesky stones doing any more pitting to the paint. I am no mechanic so if you toy around with your car you will sail through this :-)
Happy flapping !
 16 July 2012, 01:38 PM
#24
Scooby Regular
Join Date: Jul 2011
Location: Essex
Posts: 454
Likes: 0
Received 0 Likes
on
0 Posts
Hi chaps .. Flaps fitted.. 1 hour job and quite easy :-) no wheels off... (or back ) For the front , jack up and full lock and happy (tight) days getting the self tapers in.
Can't post pics as from my phone but they look good... More importantly should stop some of the pesky stones doing any more pitting to the paint. I am no mechanic so if you toy around with your car you will sail through this :-)
Happy flapping !
Can't post pics as from my phone but they look good... More importantly should stop some of the pesky stones doing any more pitting to the paint. I am no mechanic so if you toy around with your car you will sail through this :-)
Happy flapping !
I shall put an order in when payday comes around
....and if for some reason I can't fit them, I'll blame you Didly..lol
 16 July 2012, 02:54 PM
#25
Scooby Regular

Couldnt upload so I have changed the profile pic instead.. hopefully will show the rear ...
 21 July 2013, 05:57 PM
#26
Scooby Regular
Join Date: Jul 2011
Location: Essex
Posts: 454
Likes: 0
Received 0 Likes
on
0 Posts
*Holy Thread Revival Batman!*
I swear, I must be like the WORST modifier out there...although I am only doing to smallest of alterations, they just never seem to work in my favour somehow.
Take for example my Scoobyworld Mud-flaps.
Its only taken me a whole year to actually get some but now I have them, can I fit them...ermmm...no...it would seem not
Now don't worry Didly, despite what I said before, I'm not blaming you! haha
I just feel like a dumbass!
I started with the back, which weren't a problem, but then I moved on to the front only to find myself stumped by the easiest bit- the 2x clip nuts that go into the wheel arch.
The instructions tell you to remove the 2 plastic plugs and to insert the clip nuts over the wheel arch metal- nut to rear...now-that's simple enough, except for the flippin' plastic lip from my wheel arch liner is in the way!!
I figured you had to lift this away in order to slot the clip nuts underneath it but to do that you would have to remove the side skirt plug too! as the instructions say no such thing I rage-quit and aborted 'Mission Mud-Flap' until I could get a second opinion.
Naturally, Googling 'Subaru Impreza Wheel Arch' comes up with nothing in particular as who in the right mind would take a photo of a wheel arch right? Well, I would and I have! And here it is- SEXY
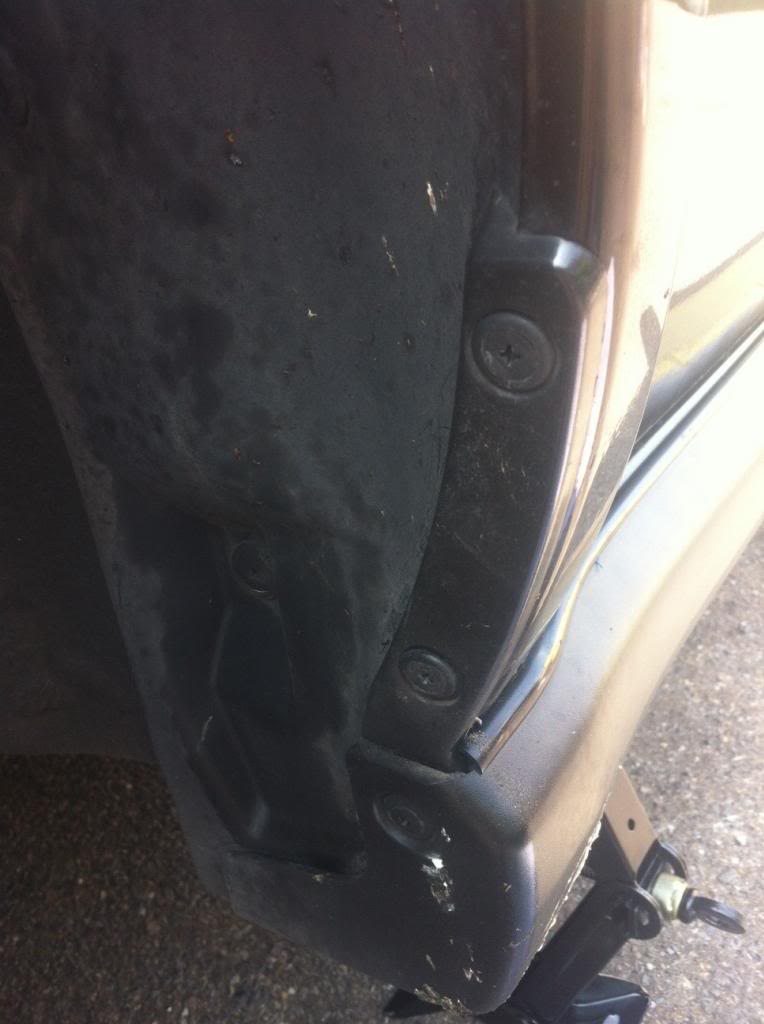
Does anyone else's wheel arch look like this? With this plastic lip? And if so and you have fitted Scoobyworld mud flaps, did you have to prize this away to fit the clip nuts?? Did you have to undo that 3rd plug below them on the side-skirt to get enough leverage? Or is my wheel arch just different from everyone elses?
I think its fair to say, if I can't even fit mud-flaps, then there really isn't much hope for me-
21 July 2013, 06:08 PM
#27
Scooby Regular
Holy cow batman ! Old thread lol. No mate I didn't have these on my inner arch. I am sure one of the helpful chaps will be along in a bit to give you a bit of good advice :-)
21 July 2013, 06:26 PM
#28
Scooby Regular
Join Date: Jul 2011
Location: Essex
Posts: 454
Likes: 0
Received 0 Likes
on
0 Posts
I know, I know I'm terrible at getting things when I say I'm going to.
...which only makes it all the more disappointing when it doesn't work
I'm so unlucky with this stuff
"Universal! Will Fit all Makes and Models, oh, except yours...yours is different."
- story of my life
...which only makes it all the more disappointing when it doesn't work
I'm so unlucky with this stuff
"Universal! Will Fit all Makes and Models, oh, except yours...yours is different."
- story of my life
21 July 2013, 06:40 PM
#29
Scooby Regular

I removed the two screws and prized the plastic lip away from the wing maybe 2-3 inches (towards the front of the car) it will go, just dont yank it too hard. when I put the new clips in they go between the plastic arch and wing. The tricky bit I had was, everytime I let go of the clips they slipped down. So what I did was, insert a very small screwdriver through the hole on the plastic arch and through the new clip too. Once I did this, I simply let go of the plastic arch. Push against it to hold the clip in place, remove screwdriver and get the screw in before letting go.
I only realised after doing all this that maybe a small tack of glue or something would of made it a lot easier for me.
On the first flap I did remove the side skirt screw but managed to do it without moving the skirt. If it makes sense to you, when I pulled the plastic arch away I sort of dislocated my wrist and mangled it in over the top. Lol
Last edited by DantheMan2605; 21 July 2013 at 06:42 PM.