Braided fuel lines problem
 05 August 2014, 09:01 PM
#1
Scooby Regular
Thread Starter
iTrader: (2)
Join Date: Jan 2014
Location: Now in Thanet
Posts: 806
Likes: 0
Received 0 Likes
on
0 Posts
Hi does anyone have any pics of a V3 or V4 sti, with braided fuel lines + finishers connected to the standard pipes.
So far I have fitted one (feed line to pipe from filter). But the other 2 pipes are too close together to be able to fit braided pipes and fittings.
Anyone have any ideas or tips for this?
Cheers
So far I have fitted one (feed line to pipe from filter). But the other 2 pipes are too close together to be able to fit braided pipes and fittings.
Anyone have any ideas or tips for this?
Cheers
 06 August 2014, 01:08 AM
#2

Hi does anyone have any pics of a V3 or V4 sti, with braided fuel lines + finishers connected to the standard pipes.
So far I have fitted one (feed line to pipe from filter). But the other 2 pipes are too close together to be able to fit braided pipes and fittings.
Anyone have any ideas or tips for this?
Cheers
So far I have fitted one (feed line to pipe from filter). But the other 2 pipes are too close together to be able to fit braided pipes and fittings.
Anyone have any ideas or tips for this?
Cheers
06 August 2014, 11:21 AM
#3
Scooby Regular
Thread Starter
iTrader: (2)
Join Date: Jan 2014
Location: Now in Thanet
Posts: 806
Likes: 0
Received 0 Likes
on
0 Posts
Ah right ok. Its just I've seen some people using them with the standard pipes but on a P1 I think. My guess is that the pipes on later versions are spaced differently with more space between them.
 06 August 2014, 12:42 PM
#5
Scooby Regular

Join Date: Apr 2013
Location: Berks
Posts: 4,224
Likes: 0
Received 0 Likes
on
0 Posts
The only reason I can think of is heat conduction being through the pipe being less on braided lines. That and if you replace the entire fuel system you can use none return valves to make disconnecting the the engine/fuel system easier and safer.
 06 August 2014, 01:08 PM
#7
Scooby Regular
Thread Starter
iTrader: (2)
Join Date: Jan 2014
Location: Now in Thanet
Posts: 806
Likes: 0
Received 0 Likes
on
0 Posts
Reason I am changing them is because the rubber hoses are all badly cracked and perishing. Plus braided ones look better esp with anodized finishers 
Trending Topics
06 August 2014, 01:19 PM
#8
Scooby Regular
Join Date: Nov 2013
Location: I'll check my gps
Posts: 2,626
Likes: 0
Received 0 Likes
on
0 Posts
 would love to see some nice pics when finished.
06 August 2014, 06:42 PM
would love to see some nice pics when finished.
06 August 2014, 06:42 PM
#9
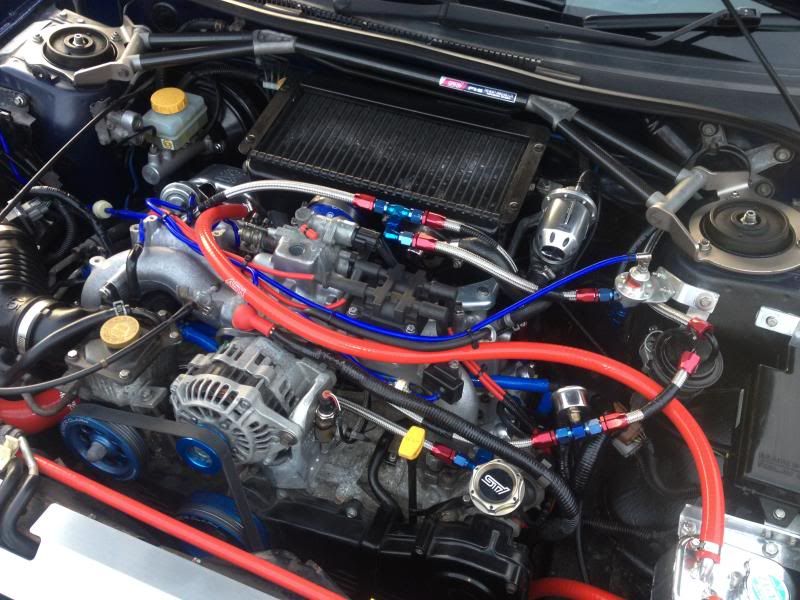
Depends on the hose. You don't just get braided and unbraided. You get different types of rubber, different linings different layerings within the hose wall etc. The metal outer braid offers protection to the rubber underneath and stops expansion. It also looks pretty. The downside is that vibrations will cause it to saw through things it touches. So make sure it is secure and there is something between the braid and anything you don't want eroded away.
There are also multiple ways of then connecting the hose with different types or connectors. Some are quick release, some allow the hose to swivel etc.
My unusual setup:
There are also multiple ways of then connecting the hose with different types or connectors. Some are quick release, some allow the hose to swivel etc.
My unusual setup:


Last edited by FMJ; 06 August 2014 at 06:44 PM.
06 August 2014, 06:58 PM
#11
Scooby Regular
Thread Starter
iTrader: (2)
Join Date: Jan 2014
Location: Now in Thanet
Posts: 806
Likes: 0
Received 0 Likes
on
0 Posts
Looks good that. So far i've only fitted 1 braided hose, I'm currently trying to work out a way of fitting the others without bending the pipes - I'm running the standard pipes, so no parallel setup.
Out of interest what kind of job is it to do a parallel setup? The only part that would confuse me is putting the manifold back, i just know i will forget where everything goes and screw it up lol
Out of interest what kind of job is it to do a parallel setup? The only part that would confuse me is putting the manifold back, i just know i will forget where everything goes and screw it up lol
06 August 2014, 07:10 PM
#12
Unmapped 12.4s @ 105

iTrader: (29)
Join Date: Apr 2005
Location: Newcastle. 330bhp-289lb/ft @ 1bar boost - 12.4s @ 105mph
Posts: 11,776
Likes: 0
Received 4 Likes
on
4 Posts
Either buy fuel rails, or get yours converted to AN-6 fittings. Then buy fittings and fuel lines to suit, you'll also need an aftermarket FRP, Fuelab or similar.
Can't really do wrong with the manifold, just undo any pipes, wiring plugs from it. When refitting, it'll be apparent where they are meant to connect to.
Can't really do wrong with the manifold, just undo any pipes, wiring plugs from it. When refitting, it'll be apparent where they are meant to connect to.
06 August 2014, 07:21 PM
#13
Ummmm just felt like it really lol. I was sick of so much clutter and did a proper delete on the aircon and Evap system/charcoal tank and all unneeded pipes under the inlet. Then started binning wires and anything I didn't need/want. Then I moved the battery and washer to the boot. Cut out the battery tray. Then I evened the bay out by moving the header tank... I like to tinker.
Power steering tank to be moved soon too. The moved header tank also moves a tiny bit of heat out of that hot turbo area of the bay and off the inlet. Gives more space in that area too which is too crowded.
For the bin after I finished tinkering...
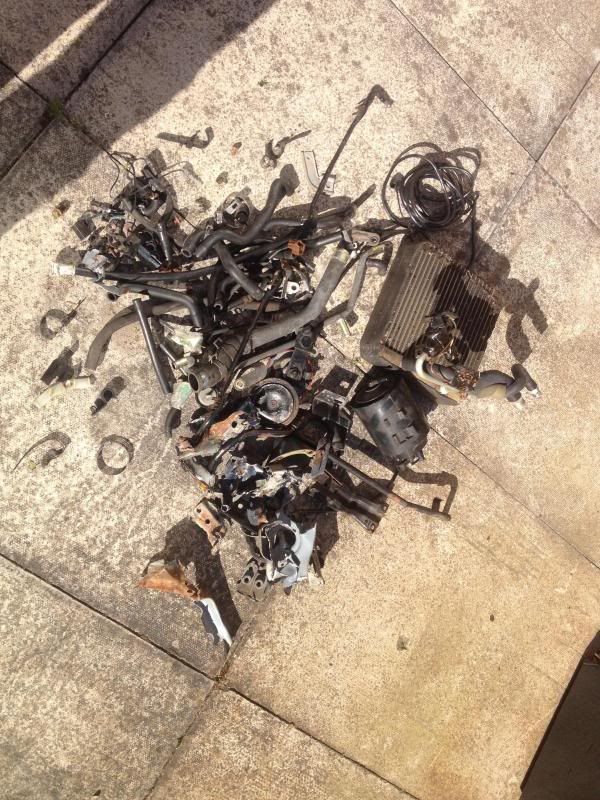
Power steering tank to be moved soon too. The moved header tank also moves a tiny bit of heat out of that hot turbo area of the bay and off the inlet. Gives more space in that area too which is too crowded.
For the bin after I finished tinkering...

Last edited by FMJ; 06 August 2014 at 07:26 PM.
 06 August 2014, 08:48 PM
#15
Scooby Regular
Join Date: Nov 2013
Location: I'll check my gps
Posts: 2,626
Likes: 0
Received 0 Likes
on
0 Posts
FMJ love the bits for the bin  and thanks for the nice pics and tips, have made a few note's in my "sad git pad" as my wife calls it
  do you mind me asking, what sort of money are you looking at for a job like that?
and thanks for the nice pics and tips, have made a few note's in my "sad git pad" as my wife calls it do you mind me asking, what sort of money are you looking at for a job like that?
Last edited by Carnut; 06 August 2014 at 08:49 PM.
06 August 2014, 10:28 PM
#17
Aircon is an easy delete other then the matrix behind the dash. I left this in place for ages with just the two pipe ends sticking out of the firewall but finally got around to getting the heater blower out and pulling the matrix which you can see in that scrap pile.
I can do how to's on any/all of it but I won't have step by step pictures.
I do have a lot of reference pictures tho.
As for cost. Which part? I was changing the clutch at the time and went a bit mad tidying up the bay. I made new brackets for things, replaced fittings, rerouted things and all sorts it also took a long time and a lot of graft.
I can do how to's on any/all of it but I won't have step by step pictures.
I do have a lot of reference pictures tho.
As for cost. Which part? I was changing the clutch at the time and went a bit mad tidying up the bay. I made new brackets for things, replaced fittings, rerouted things and all sorts
it also took a long time and a lot of graft.
06 August 2014, 10:31 PM
#18
06 August 2014, 10:46 PM
#19
Removed the glove box.
Disconnected the heater blower, aircon sensor and head lamp washer relay.
Dropped the motor/blower out of its housing (three screws I think). You may not have to do this but I did at the time as I was working out how it all came apart.
Then I used various socket extensions and knuckles/uj's to get to the bolts (some are hidden right up in the darkness behind the dash) so I could carefully wiggle the blower housing out. The housing contains the aircon matrix.
You have to unhook the mechanical cables that attach to it from the heater controls too.
Once the housing is out you can remove the aircon matrix and bin it.
You will have a few holes where the aircon pipes and thing went. I blocked these with tightly packed blocks of high density foam. If you don't block them you will loose some of the blow from the heater blower.
I then plugged the firewall holes and used them as grommets for the cables from my battery to boot relocation.
I also had the passenger footwell carpet up at the time but I don't think this made any difference.
It's an awkward job but not too difficult. And not something you can really get wrong.


Thread
Thread Starter
Forum
Replies
Last Post