DIY Porting Headers
 06 January 2009, 09:53 AM
#1
Scooby Regular
Thread Starter
iTrader: (1)

Join Date: Sep 2008
Posts: 550
Likes: 0
Received 0 Likes
on
0 Posts
have got my headers off the car, got some tubulars on for now. was gona port them,
have had a look on search and found a few threads but some are really. old.
what is the best way to port the headers? just try and take a bit off all the edges to nearly match the gasket size?
what tools do i need?
130 WATT DIE GRINDER AND FLEXISHAFT IN HARD CARRY CASE on eBay, also, Air Tools, Power Tools, Business, Office Industrial (end time 07-Jan-09 09:06:40 GMT)
would something like this be up to the job? already have a decent sized hammer drill at home, do i want a dremel, and some sort of die grinder.
are these all the tools? and any tips on technique? do i just want to try and take a few mm off every side
 06 January 2009, 10:08 AM
#2

I looked to do this on my V3 STi but having taken the original headers off, all the mating surfaces appeared to match up even those onto the head. I eventually used a rotary burr to grind off any casting marks and made the pipe to pipe connections the same. I used an electric router with a flexi drive in it. Search for Harvey he appears to be an expert and as it is a sh---y job best ask him.
06 January 2009, 11:12 AM
#3

Something with a bit of guts is need to do the job quickly with a Dremel type tool to finish things off.
The open in the link is only as powerful as a Dremel, so will take you quite a while.
Either get an air powered die grinder or a 110v electric grinder - I use a Hitachi X100.
Get right inside the pipes either a long nose (eg X100) or one that can be clamped in place and has a flexi drive on it is needed.
If its a single set of headers then it would be cheaper either hire the grinder or send them off to Harvey to be finished.
Nick
06 January 2009, 12:32 PM
#4
Scooby Regular
Thread Starter
iTrader: (1)
Join Date: Sep 2008
Posts: 550
Likes: 0
Received 0 Likes
on
0 Posts
ok, im going to be doing it myself, if nothing else to learn how its done. so will either rent, or probably end up buying one. could end up similar price to paying someone to do it anyway.
budget of around �60 ideally. unless i stumble upon a decent second hand compressor going cheap then ill go the air tools route.
can anyone recommend a electric one around this price? ideally not 110 as i dont own a transformer
budget of around �60 ideally. unless i stumble upon a decent second hand compressor going cheap then ill go the air tools route.
can anyone recommend a electric one around this price? ideally not 110 as i dont own a transformer
Last edited by Style; 06 January 2009 at 12:33 PM.
06 January 2009, 04:53 PM
#5
Scooby Regular
iTrader: (2)

Join Date: Oct 2002
Location: Chester
Posts: 1,052
Likes: 0
Received 0 Likes
on
0 Posts
I just used a powerful 240 volt drill with a long shaped pear grind stone bought for �4 from local tool shop ,took about an hour to open up pipe entrys to gasket size , its amazing how much material is removed before there was a huge lip now matched . Left pipe outlets as they were .
The first set i did a few years ago i used a air driven grind stone off a compressor but to be honest there was not much difference between that and the 240 volt drill and a new grind stone in the chuck .
Mark
The first set i did a few years ago i used a air driven grind stone off a compressor but to be honest there was not much difference between that and the 240 volt drill and a new grind stone in the chuck .
Mark

Trending Topics
07 January 2009, 07:47 AM
#8
Scooby Regular
iTrader: (2)
Join Date: Oct 2002
Location: Chester
Posts: 1,052
Likes: 0
Received 0 Likes
on
0 Posts
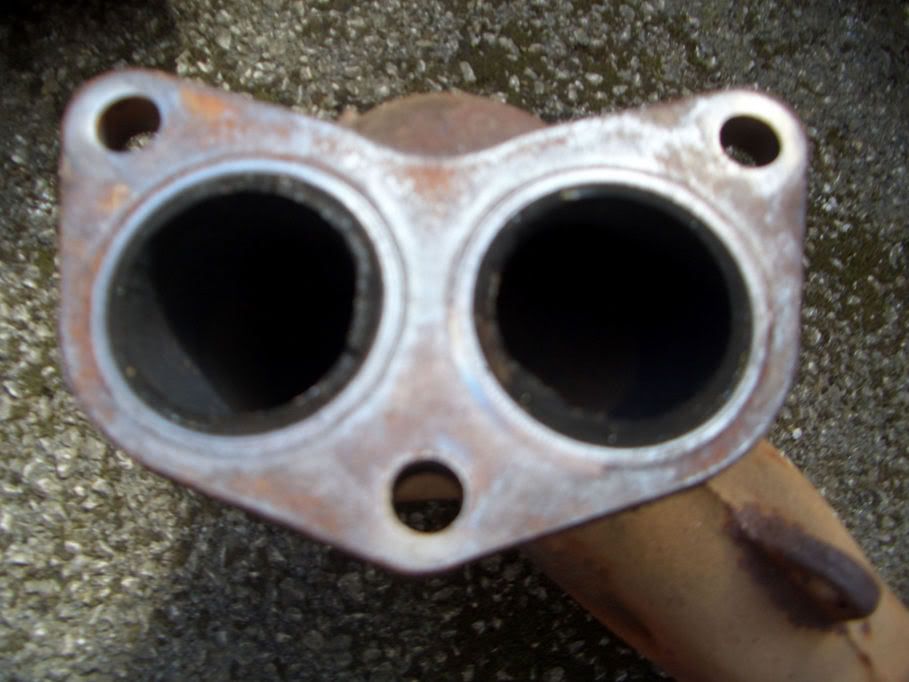
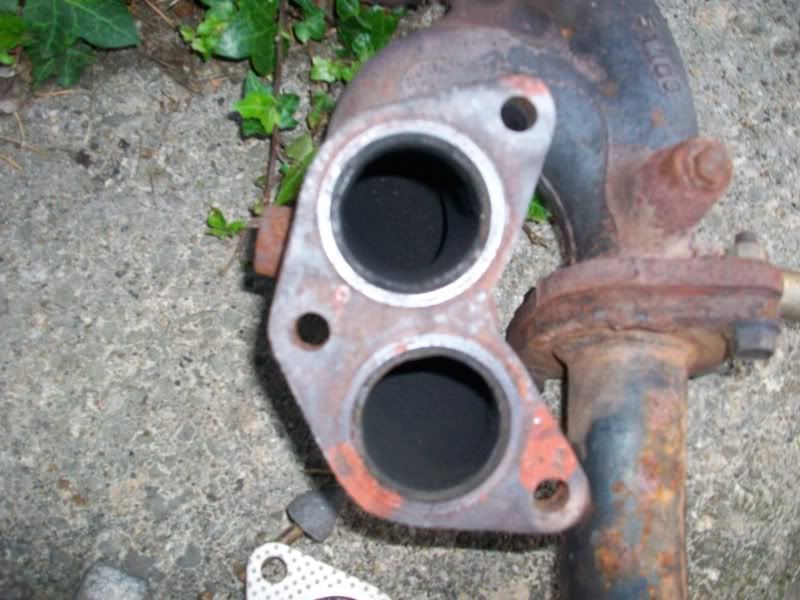
You open up the inlet opening on all pipes to match the size of the gasket opening , when you remove them you will see the pipe openings to be a lot smaller than the gasket openings so cause a flow restriction , there will be a ring of soot use this as a marker line when you open them up .
Mark
Mark
07 January 2009, 08:54 AM
#9
Scooby Regular
Thread Starter
iTrader: (1)
Join Date: Sep 2008
Posts: 550
Likes: 0
Received 0 Likes
on
0 Posts
ok great, ive got a big hammer drill as i say, so ill get a pear grinder.
luckily there is quite a decent sized vice on the bench in my garage at the moment.
is it best to match the inlet of the pipes to the gasket, or i read somewhere you want to leave a lip. would of thought matching them would be best, is it?
and di you open up any other places along the pipes? or do you just do the inlet pipes of the exhaust manifold? - and doing this do you notice an improvement
Last edited by Style; 07 January 2009 at 09:01 AM.
07 January 2009, 09:21 AM
#10
Scooby Regular
iTrader: (2)
Join Date: Oct 2002
Location: Chester
Posts: 1,052
Likes: 0
Received 0 Likes
on
0 Posts
You only open up the inlets on the pipes eg manifold on both sides ,crossover pipe ,collector and up pipe .The outlets on all these you leave ,eg the step is left .
Mark
Mark
07 January 2009, 10:58 AM
#11
Scooby Regular
Thread Starter
iTrader: (1)
Join Date: Sep 2008
Posts: 550
Likes: 0
Received 0 Likes
on
0 Posts
ahhh i see. so only matching up the start of each section to the size of the gasket.
i cant remember how many joins there are but im only doing the start of each join as in the pic.
( i know its a bit basic, but is that the general idea. port out the bits in red to match the gasket and completely leave the sides in blue
Free Virtual Drive - porting pic.bmp
edit: dont laugh at my rubbish pic , i drew it in paint!
i cant remember how many joins there are but im only doing the start of each join as in the pic.
( i know its a bit basic, but is that the general idea. port out the bits in red to match the gasket and completely leave the sides in blue
Free Virtual Drive - porting pic.bmp
edit: dont laugh at my rubbish pic
, i drew it in paint!
Last edited by Style; 08 January 2009 at 09:27 AM.
08 January 2009, 09:26 AM
#12
Scooby Regular
Thread Starter
iTrader: (1)
Join Date: Sep 2008
Posts: 550
Likes: 0
Received 0 Likes
on
0 Posts
ttt think that is right in the pic,
what grind bits can i get? only ones in b&Q were small pink grind stones, not as beefy as i would like but if they'll do the job ill get them.
they were similar to these pink stones below
5 Piece Mixed Mounted Point Pack E, Drill, Die grinder on eBay, also, Air Tools, Power Tools, Business, Office Industrial (end time 01-Feb-09 12:02:19 GMT)
could these do the jpb, (if not a little longer) or do i need to get bigger grind stones? - having trouble finding somewhere that sells them
09 January 2009, 08:28 AM
#13
Scooby Regular
Thread Starter
iTrader: (1)
Join Date: Sep 2008
Posts: 550
Likes: 0
Received 0 Likes
on
0 Posts
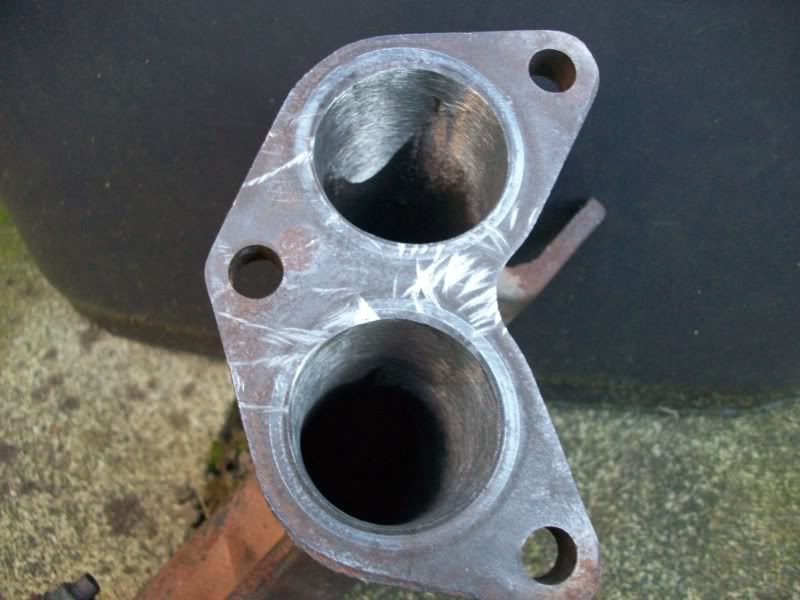
Rite, got those ones from above. done the cast manifold inlets, they were pretty soft, enlargerd to the size of the soot ring.
on the start of the crossover pipes theres some pretty tough steel pipe welded inside. do you want to grind down the steel pipes in the center a bit?
and how do you do the up pipe? at the inlet do you want to grind the steel tubing in the middle and part of the cast outer case up to the soot mark? hows best to do uppipe
09 January 2009, 08:43 AM
#14
Scooby Regular
iTrader: (4)

Join Date: Apr 2005
Location: Co. Down, Northern Ireland
Posts: 562
Likes: 0
Received 1 Like
on
1 Post
If u can cud you stick a few pics up of what you have done?? im following the thread picking out all the advice as it comes, ideally ill be getting harveys ported and wrapped headers but i dunno if i can afford it before mapping and this might bridge the gap for now , cheers
09 January 2009, 11:00 AM
#15
Scooby Regular
Thread Starter
iTrader: (1)
Join Date: Sep 2008
Posts: 550
Likes: 0
Received 0 Likes
on
0 Posts
ok mate, ill see if i can take a few on my camera phone tonight, but i wont have a before picture as ive already grinded out he two main inlets. but you can see where i have done up to though.
still want someone whos done it to comment on the uppipe and crossover parts. i.e the steel piping inside
still want someone whos done it to comment on the uppipe and crossover parts. i.e the steel piping inside
09 January 2009, 11:39 AM
#16
Scooby Regular
iTrader: (4)

Join Date: Sep 2005
Location: The yorkshire dales - best roads in the UK
Posts: 3,311
Likes: 0
Received 0 Likes
on
0 Posts
If u can cud you stick a few pics up of what you have done?? im following the thread picking out all the advice as it comes, ideally ill be getting harveys ported and wrapped headers but i dunno if i can afford it before mapping and this might bridge the gap for now , cheers
 14 January 2009, 09:31 AM
#18
Scooby Regular
Thread Starter
iTrader: (1)
Join Date: Sep 2008
Posts: 550
Likes: 0
Received 0 Likes
on
0 Posts
hi mate,
yea put them on the car on saturday. love it! will be on full boost just after 3000rpm. it kicks in earlier. however one thing i will say, the tubulars did seem faster top end, but low down acceleration is much better with the ported. really pleased.
next gona raise boost and fit a fmic to try and compensate for the now bit slower top end.
14 January 2009, 09:33 AM
#19
Scooby Regular
iTrader: (4)
Join Date: Apr 2005
Location: Co. Down, Northern Ireland
Posts: 562
Likes: 0
Received 1 Like
on
1 Post
Super, i have an RA so top end doesnt matter much to me i want it to be ballistic down low  good to know, will have to get cracking, did you Wrap your headers and downpipe? is it a worthwhile mod? just got heat wrap mega cheap if i want it so was gonna do both
good to know, will have to get cracking, did you Wrap your headers and downpipe? is it a worthwhile mod? just got heat wrap mega cheap if i want it so was gonna do both
18 September 2009, 06:19 PM
#20
Scooby Regular
iTrader: (4)
Join Date: Oct 2008
Location: skipton north yorkshire
Posts: 863
Likes: 0
Received 0 Likes
on
0 Posts
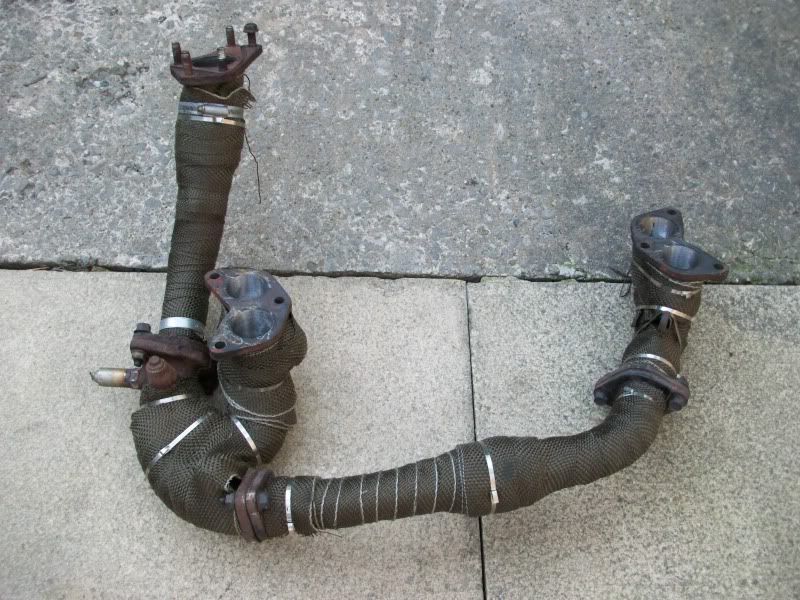
after reading this i did the same hears a few pics and its a different car spools up so much quicker and sooner ,and to be honest it is not that hard to do and cost me less than 2 quid to buy the drill grinding point ,to do it took about 90 mins and then about 60 mins to heat wrap it

so as advised i ported it out by 2/3mm back to the next ring size this is now the same size near as matters as the gasket

then it was time for the heat wrap easy to do apart from the stupid **** metal tie wraps so used a few extra jubilee clips and wet the wrap first to stop the fibreglass itch

so as advised i ported it out by 2/3mm back to the next ring size this is now the same size near as matters as the gasket
then it was time for the heat wrap easy to do apart from the stupid **** metal tie wraps so used a few extra jubilee clips and wet the wrap first to stop the fibreglass itch
02 March 2012, 12:07 PM
#21
Scooby Regular

Join Date: Oct 2011
Location: dorset
Posts: 47
Likes: 0
Received 0 Likes
on
0 Posts
Just ran across this thread as i was thinking of porting my headers, and i was gonna suggest using some engineers blue to get the matching perfect, doesnt seem like anyone else has mentioned it.
02 March 2012, 01:56 PM
#22

I believe the step caused by the larger manifold inlet is intentional in order to help prevent reversion in the flow. I wouldn't know if a perfect match would work better or not - I'm sure someone else would know.
I think that the port match isn't far off already its just the gaskets have much larger bores to ensure they never impede the flow however bad any machining is. Whilst this little gap all around is not ideal, it really isn't much of a problem and definitely better than opening up the cylinder head port and manifold inlet to the gasket diameter - that is something you DON'T want to do.
I think that the port match isn't far off already its just the gaskets have much larger bores to ensure they never impede the flow however bad any machining is. Whilst this little gap all around is not ideal, it really isn't much of a problem and definitely better than opening up the cylinder head port and manifold inlet to the gasket diameter - that is something you DON'T want to do.
08 June 2016, 12:52 PM
#24
Scooby Regular
Join Date: Apr 2014
Location: Loughborough
Posts: 303
Likes: 0
Received 0 Likes
on
0 Posts
after reading this i did the same hears a few pics and its a different car spools up so much quicker and sooner ,and to be honest it is not that hard to do and cost me less than 2 quid to buy the drill grinding point ,to do it took about 90 mins and then about 60 mins to heat wrap it
so as advised i ported it out by 2/3mm back to the next ring size this is now the same size near as matters as the gasket
then it was time for the heat wrap easy to do apart from the stupid **** metal tie wraps so used a few extra jubilee clips and wet the wrap first to stop the fibreglass itch
so as advised i ported it out by 2/3mm back to the next ring size this is now the same size near as matters as the gasket
then it was time for the heat wrap easy to do apart from the stupid **** metal tie wraps so used a few extra jubilee clips and wet the wrap first to stop the fibreglass itch
Should I strip the headers and port the cross pipes also or just the areas on the manifold gaskets as pictured.
Have an as performance on its way from a helpful member so looking forward to the install.
 13 June 2016, 05:40 PM
#26
Scooby Regular
Join Date: Apr 2014
Location: Loughborough
Posts: 303
Likes: 0
Received 0 Likes
on
0 Posts
I know this is going to sound stupid but as the as performance pipe I have is (I assume) ported what gaskey would I be ordering, import car parts has standard, 2.5" and 3" gaskets for the up pipe. Could I order the 3" and port up pipe to that. Never don't this sort of mod is all.
07 July 2016, 12:11 PM
#28
Scooby Regular
Join Date: Apr 2014
Location: Loughborough
Posts: 303
Likes: 0
Received 0 Likes
on
0 Posts

New gaskets have arrived so planning to port the exhaust this weekend fingers crossed. Just to clarify 100% I am gasket matching the sides marked in red and leaving the ends marked blue in this pic...... (sorry to annotate on somebody else's pic was just easier).
Last edited by Evansawd; 07 July 2016 at 12:12 PM.