Turbo inlet hose
 25 January 2009, 11:46 AM
#1
Scooby Regular
Thread Starter
iTrader: (1)
Join Date: Apr 2007
Location: Ayrshire
Posts: 696
Likes: 0
Received 0 Likes
on
0 Posts
How hard is it to change this hose? Looks like you might need to take the inlet off?
Does anyone know of a fitting guide?
Mine is slightly burst and perished at the turbo so I need to change it pretty quick.
Does anyone know of a fitting guide?
Mine is slightly burst and perished at the turbo so I need to change it pretty quick.
 25 January 2009, 11:52 AM
#2
Scooby Regular
iTrader: (3)
Join Date: Jan 2009
Location: Midlands
Posts: 343
Likes: 0
Received 0 Likes
on
0 Posts
I done mine the other day and had to take the inlet manifold off!
If your mechanical minded its well easy!!!!
Aint sure if theres a guide on here or a diffrent way of taking it off?
If your mechanical minded its well easy!!!!
Aint sure if theres a guide on here or a diffrent way of taking it off?
25 January 2009, 12:00 PM
#3
Scooby Regular
iTrader: (7)
Join Date: Sep 2007
Location: Shoreham Beach
Posts: 1,353
Likes: 0
Received 0 Likes
on
0 Posts
yeah also did mine the day, easy, but be patient, i managed to just lift the manifold up abit and slide, (push, swear, struggle.) but got it through. The whole thing took me about 2 and bit hours, and I don't really know much.
Enjoy
Enjoy
25 January 2009, 12:10 PM
#5
Scooby Senior
iTrader: (3)
Join Date: Jun 2006
Location: Slowly rebuilding the kit of bits into a car...
Posts: 14,333
Likes: 0
Received 0 Likes
on
0 Posts
Yep !
That makes it easier to do ! Just make a mental note of where all the electrical connectors go ! As the engine loom is bolted to the underside of said manifold.
HTH
dunx
P.S. you may need a thin wall socket to get to the bolts, two are really tight for access.
That makes it easier to do ! Just make a mental note of where all the electrical connectors go ! As the engine loom is bolted to the underside of said manifold.
HTH
dunx
P.S. you may need a thin wall socket to get to the bolts, two are really tight for access.
25 January 2009, 12:14 PM
#6
Scooby Regular
Thread Starter
iTrader: (1)
Join Date: Apr 2007
Location: Ayrshire
Posts: 696
Likes: 0
Received 0 Likes
on
0 Posts
Just out of interest, are there any gains to be had by going parallel as my car is getting mapped on Friday and might be able to get it done before then? Or is it more a safety thing to ensure all injectors get fed the same?
25 January 2009, 12:21 PM
#7
Scooby Regular

Join Date: Oct 2008
Location: co.louth,eire
Posts: 729
Likes: 0
Received 0 Likes
on
0 Posts
did mine a good while ago and took some time to fit without removing manifold....
what is the advantage on the parallel fuel rail mod???
does anyone supply a kit for this???
what is the advantage on the parallel fuel rail mod???
does anyone supply a kit for this???
Trending Topics
25 January 2009, 06:20 PM
#8
Scooby Senior
iTrader: (3)
Join Date: Jun 2006
Location: Slowly rebuilding the kit of bits into a car...
Posts: 14,333
Likes: 0
Received 0 Likes
on
0 Posts
The old myth/story is that number three is last in line for a drink !
So parallel mod splits the feed into two lines, so better fuel supply to all four injectors. Then T'd back to the regulator.
I think this started with early mod-BHP cars, pushing std sytem way beyond it's ability to fuel. imho.
dunx
P.S. Mine has it just in case !
So parallel mod splits the feed into two lines, so better fuel supply to all four injectors. Then T'd back to the regulator.
I think this started with early mod-BHP cars, pushing std sytem way beyond it's ability to fuel. imho.
dunx
P.S. Mine has it just in case !
26 January 2009, 12:34 AM
#9
Scooby Regular
iTrader: (9)
Join Date: Oct 2006
Location: midlands
Posts: 2,316
Likes: 0
Received 0 Likes
on
0 Posts
1. inter cooler off
2. battery/washer bottle off
3. disconnect the 3 loom plugs from the battery area (brown plug i think)
4. disconnect coil packs
[IMG] [/IMG]
5. fuel pipes, release petrol cap to remove excess pressure,when u remove pipes put the ic bracket bolts into the pipes to stop excess leakage
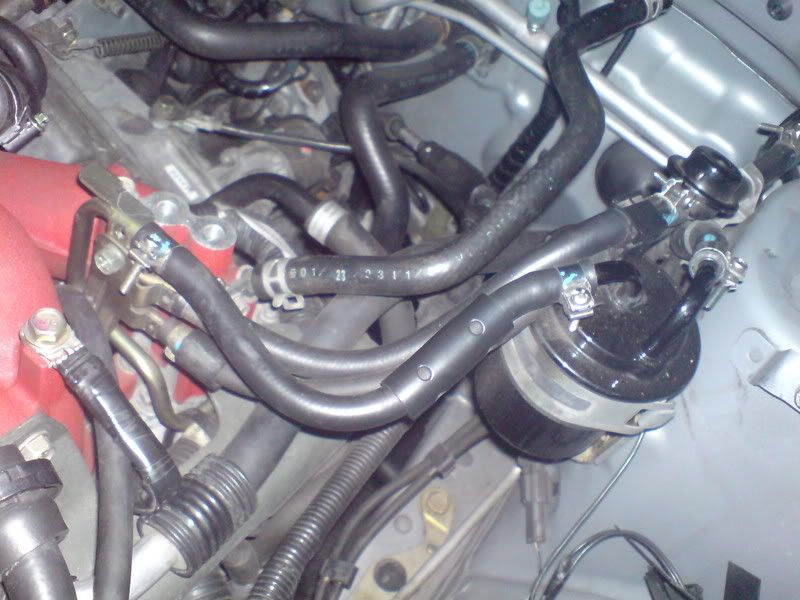
6.unbolt the earth strap on the inlet manifold(next to fuel pipe)
7.working across the engine remove all engine breather pipes including underneath ie gearbox breather
8. remove all this pipe work to gain access to the plugs underneath
[IMG]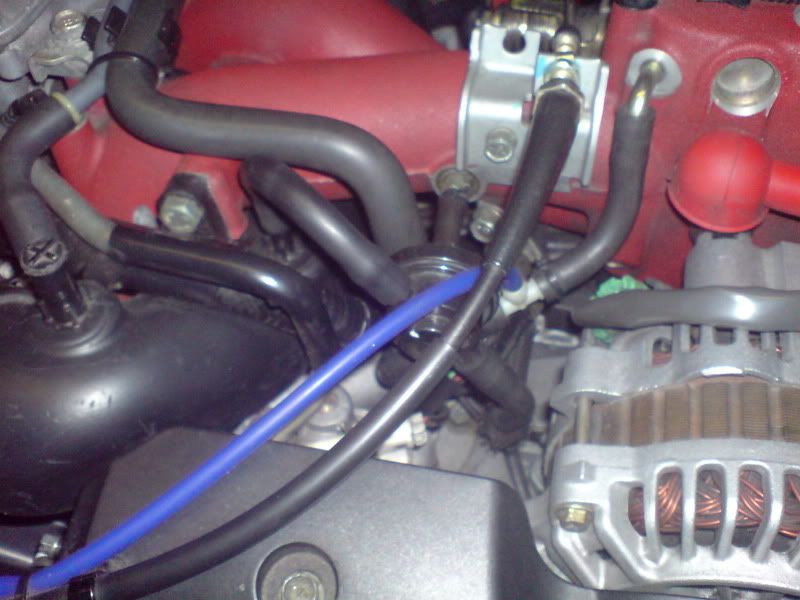 [/IMG]
9.underneath there are 3 plugs the little white one in pic,sender under the alternator going into the block and one on the valve that u removed the pipes off
10.undue the steel power steering pipe banjo hose
11.remove accelerator cable(PAINT A MARK ON THE THREAD SO IT GOES BACK IN THE SAME PLACE,TIP EX WILL DO) and all plugs going into throttle body and unplug the oem knock link.
12.unplug maf
13. unplug any plugs going to the black bracket on the inner(where boost solenoid is)
14.remove air box fully
15.remove all pipes on header tank(release pressure out cap first),place some old spark plugs in pipes if u have them handy
[IMG]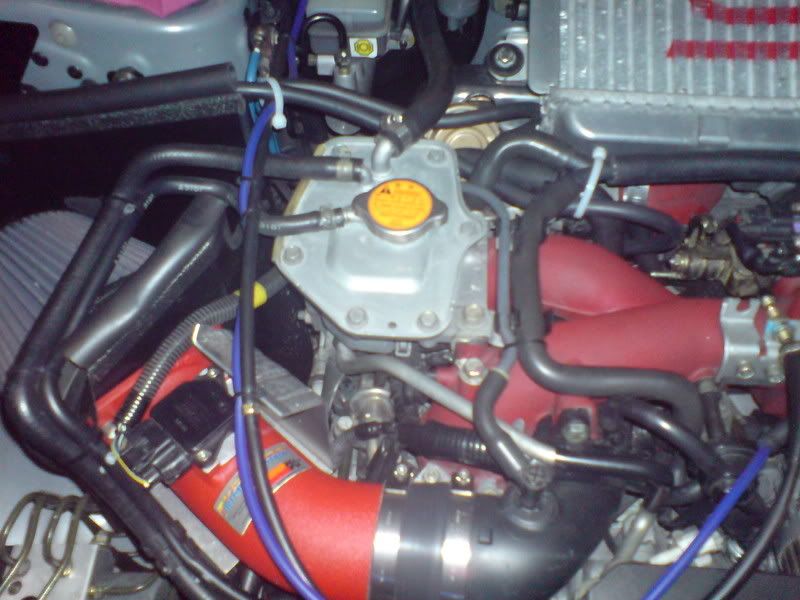 [/IMG]
16.remove header tank
17.undo jubilee in turbo inlet pipe
18. unplug coil packs turbo side
19. PLEASE NOTE ON MY STI HEADS I HAD 4 PLUGS at each end think it was for the variable cam timing.if sti unplug these.
20.there are 4 bolts holding the lower part of the inlet down one front and back and 2 in the middle(both sides)DO NOT REMOVE THE SMALLER ONES HOLDING THE UPPER PART OF THE INLET TO THE LOWER CHAMBER PART AS YOU WANT TO REMOVE COMPLETE......
21. i had to bend the air pipe slightly to lift the inlet.
22. check all breathers,loom plugs pipes etc etc are unplugged out the way and try lift the inlet,u have to lift the bk slight and wiggle it a bit but it will come out complete inlet pipe fuel rails loom under the inlet injectors everything
23. you should end up with this,WHILE OFF I DONE THE WATER INLET BY PASS MOD,THE PIPE YOU TAKE OFF THE INLET PUT IT STRAIGHT ONTO THE GREEN WATER FEED PIPE IT COMES OFF.......
[IMG]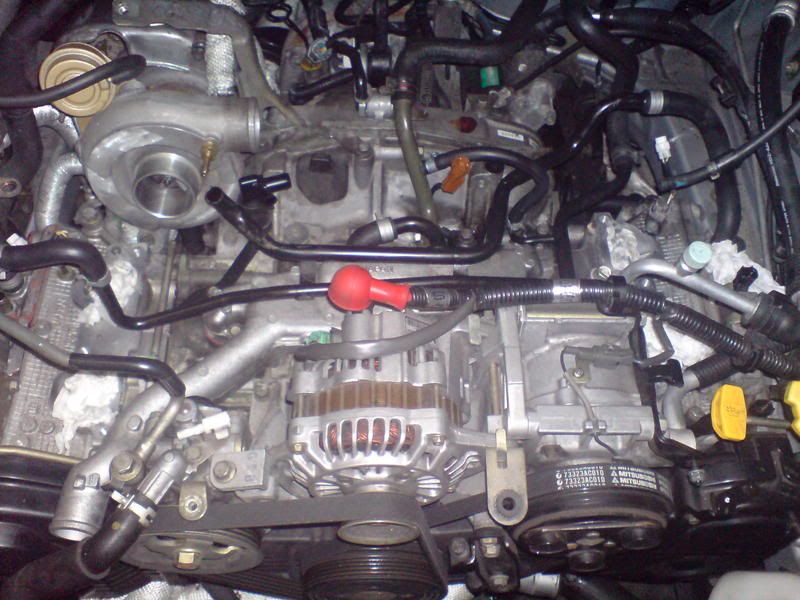 [/IMG]
[IMG]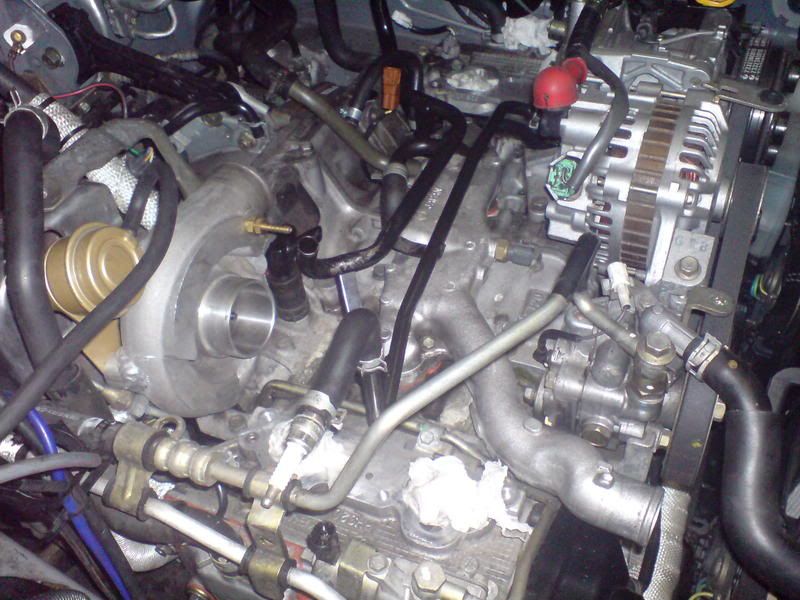 [/IMG]
24. once off ,take green brackets off that cover the injectors and put them in the bin or grind the lower half off.
25. slacken the bolt of the inlet pipe
26. underneath slacken fuel rail/loom off and change your inlet pipe(DONT REPLACE WITH A SILOCONE ONE.
replace gaskets on inlet,refit in reverse and fill water up by the turbo pipe.hope got everything in
took me ages to write it lmao good luck
2. battery/washer bottle off
3. disconnect the 3 loom plugs from the battery area (brown plug i think)
4. disconnect coil packs
[IMG]
[/IMG]5. fuel pipes, release petrol cap to remove excess pressure,when u remove pipes put the ic bracket bolts into the pipes to stop excess leakage
6.unbolt the earth strap on the inlet manifold(next to fuel pipe)
7.working across the engine remove all engine breather pipes including underneath ie gearbox breather
8. remove all this pipe work to gain access to the plugs underneath
[IMG]
[/IMG]9.underneath there are 3 plugs the little white one in pic,sender under the alternator going into the block and one on the valve that u removed the pipes off
10.undue the steel power steering pipe banjo hose
11.remove accelerator cable(PAINT A MARK ON THE THREAD SO IT GOES BACK IN THE SAME PLACE,TIP EX WILL DO) and all plugs going into throttle body and unplug the oem knock link.
12.unplug maf
13. unplug any plugs going to the black bracket on the inner(where boost solenoid is)
14.remove air box fully
15.remove all pipes on header tank(release pressure out cap first),place some old spark plugs in pipes if u have them handy
[IMG]
[/IMG]16.remove header tank
17.undo jubilee in turbo inlet pipe
18. unplug coil packs turbo side
19. PLEASE NOTE ON MY STI HEADS I HAD 4 PLUGS at each end think it was for the variable cam timing.if sti unplug these.
20.there are 4 bolts holding the lower part of the inlet down one front and back and 2 in the middle(both sides)DO NOT REMOVE THE SMALLER ONES HOLDING THE UPPER PART OF THE INLET TO THE LOWER CHAMBER PART AS YOU WANT TO REMOVE COMPLETE......
21. i had to bend the air pipe slightly to lift the inlet.
22. check all breathers,loom plugs pipes etc etc are unplugged out the way and try lift the inlet,u have to lift the bk slight and wiggle it a bit but it will come out complete inlet pipe fuel rails loom under the inlet injectors everything
23. you should end up with this,WHILE OFF I DONE THE WATER INLET BY PASS MOD,THE PIPE YOU TAKE OFF THE INLET PUT IT STRAIGHT ONTO THE GREEN WATER FEED PIPE IT COMES OFF.......
[IMG]
[/IMG][IMG]
[/IMG]24. once off ,take green brackets off that cover the injectors and put them in the bin or grind the lower half off.
25. slacken the bolt of the inlet pipe
26. underneath slacken fuel rail/loom off and change your inlet pipe(DONT REPLACE WITH A SILOCONE ONE.
replace gaskets on inlet,refit in reverse and fill water up by the turbo pipe.hope got everything in
took me ages to write it lmao good luck
Last edited by maydew; 26 January 2009 at 01:26 AM.

Thread
Thread Starter
Forum
Replies
Last Post
jobegold@hotmail.co.uk
ScoobyNet General
2
27 September 2015 09:44 PM